


6
5
 4
4
3

2

1

Note - pictures correspond to directions from bottom picture to top.

5
 4
4
3

2

1

An inquiry tonight has reminded me that I must offer this stitching technique I dreamed up when I made my Birds and Bloom card {see earlier post} - because 'stitching' on paper is so 'IN' at the moment and I love the added texture, but its more than that - its very ' home-spun ' don't you agree?
At any rate, you can add the 'stitched' look in a variety of ways, and they range from simple {create faux stitches with a marker} to the more detailed like this technique.
However, time-consuming this may be, there is 1 benefit - its actually relaxing once you get the gist of it, as its repetitive - so set yourself up somewhere cozy and on a quiet moment, and enjoy!
Note - pictures correspond to directions from bottom picture to top.
Step 1 - Determine your Design.
Think of how you would like to incorporate your 'stitched design' into your project. For my example, I wanted it to take a supporting role, so it is placed as a "background" element and therefore, it runs behind the main focus {the birds and tag}. It will run the width of my card as well.
As an added design element - I've decided to incorporate a strip of ribbon - so I've decided to 'stitch OVER the ribbon' - therefore I must chose a ribbon.
I "eye-balled" the ribbon width to begin the placement of the ribbon and to border it with stitches. Take a moment to run a length of ribbon behind the tag so you get the sense of where you plan on the ribbon 's position - I have chosen to place it behind the middle 'point' of the tag - it feels like a natural point to start.
Step 2. Prepare the ' first ' line of paper piercing to accomodate the stitching.
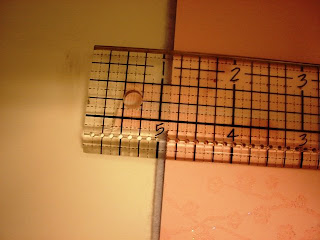
Here I have a special ruler that has holes in it for paper piercing, but a regular ruler will act as a guideline. Pic #1
**Measure a 'starting point' with your ruler - see mine begins exactly at the no. 5 -in the picture. This will help you to measure the next line in order to 'alternate' the position of the stitches. Pic #2
Pierce your dots in a steady, line and spaced at regular intervals. I choose to pierce every 'second' hole {of my ruler} or at least, every few mm. along the ruler's edge. Pic #3
Step 3. Repeat the ' second ' line of paper piercing.
Move the ruler over - now I am beginning just slightly before no. 5 - and start the piercing again, same as the first time. Depth: placed at a distance from the first line to be slightly ' wider ' than the width of the ribbon. This ensures the ribbon will 'slide into place' easily when you stitch over it later. Pic #4
Draw a pencil line [erase later after piercing and before stitching] if it helps to keep you steady - avoid getting 'blurry' vision.
Step 4 - Stitch with Thread
Using cross-stitch thread, nice and fuzzy plus so many colours!....and a proper needle, I now begin to stitch "over top of the ribbon" - first one direction, and then coming back in the opposite direction over top the first set of stitches. {shown in finished card} Pic #5 + #6
The fact that I started the second row of holes to be slightly off-centered from the first row means my "criss-cross" stitching comes naturally.
Tie off threads neatly. Voila - you're done! Let me know how it works for you! Thanks!!
Beverly
bstampingbeehive.blogspot.com

1 comments:
Nice tutorial! I love to do the faux stitching, however I seem to have misplaced my tool for that. Hopefully I will find it soon! Beautiful card too.
-Darleia
Post a Comment