30 May 2010

Happy Moments from Stampin' Up!

Hello stampers and crafters alike!

Quick post today as I am off to a craft auction!  Yeah - wonder if I successfully bid on anything, well, we'll see!

Meanwhile I am going to leave you with this - our HAPPY MOMENTS stamp set is one that I adored receiving as a prize from my upline Caroline!

It so darn cute and I love the little bird in his cage - awww!  Also, another stamp set FAVORITE THOUGHTS has 4 fantastic sayings from a woman's perspective - and ones attributed to some famous gals like Eleanor Roosevelt (she has a lot of good sayings!)

But I thought the idea of dangling my birdcage was too cute to pass up!  I sent this card yesterday off into the mail and I hope the person who receives it loves it!


Have a nice day y'all!

28 May 2010

REMINDER BLOG CANDY UP FOR GRABS - MONDAY 31rst!

Just a reminder.....my blog candy is up for grabs...still have to end of MON to leave a comment on ANY  of my posts, or JOIN as a follower. or make a MENTION ME ON YOUR BLOG.   So far, people commenting are not qualified - as no demos, international outside of N.America. So it remains up for grabs!  If no one qualifies - it goes back into my blog treasure box, lol!

Cheers!

bLOg CaNDy =
(1) On Board Mini Album Book from Spring or Summer Mini Catalogue (may be a bird or suitcase) ***
(1) Ink Pad ( your choice) +
 (1) Sanding Block + 
(1) STAMP  (value up to $12) and an assortment of die-cuts from my personal collection.


***I may have to subsitute the On Board due to availability but it will be an On Board item!  I will ask the winner what colour INK PAD they would like. 


Baby Scrapbook Layout and DIY " Top Note " Frame

Hello to everyone out there on this nice Friday evening!  I am going outside for my evening walk with Pepper but not before I bring out my craft results from today!  I'm really happy about this one too! Here's why....

As Stampin' Up! Demonstrators, we're entitled to receive a monthly glossy magazine, Stampin Success - and I tell you - I look forward every month to receiving mine, lol. Last December's mag, showcased our Artisan Award winners who had been given a challenge and a new stamp set from SU!

One of these lucky ladies was Demonstrator Shanna Jensen  with her pretty scrapbook page featuring a "Love You Much Frame"  - and the frame is made using 4 TOP NOTE die-cuts - and I loved it!!!

I kept this idea in the back of my head until this morning, I just got inspired to create one for myself!

Here's Shanna's inspiring project which if you notice features her putting her own 'stamp' on the Designer Paper - now isn't it just lovely?


And here is mine.....I love it! 


{Yeah....that's me and my toots long time ago! She calls it her 'unicorn hairdo' ! }


This is a nice way to frame a picture without the need to own a large-sized die-cut frame. You could make it as big as you need.  Shanna seems to have cut her frame to fit 'outside' of her picture - or with the picture mounted behind. 
I chose to mount my picture on 'top' of the frame - and here is how I made it......

1. Cut out 4 Top Note diecuts using the 'TOP NOTE' Die (see our catalogue) for the Big Shot. 

TAKE A CLOSER LOOK - CLICK ON PHOTOS TO ENLARGE 


2. Assemble the die-cuts together - layering them to over-lap, and aligning the curve outline in a pleasing fashion. Don't worry - it sort of 'falls' into place :)

See like this: 


Continue till all 4 are secured together:


Now I try not to cut or glue all of my pictures if I am using the originals, so I made photo-corners and attached those to a layer of beige patterned paper: 


Now I can glue this paper frame to the larger pink one, but  first some stamping! 

If you wish to do as Shanna and I have, pick a nice stamp that you can repeatly stamp to create a border. 

I chose our WEDDING SWEET stamp set because it has co-ordinating flourishes in several sizes - this works great to create an entire project with the same design but featuring different areas of interest. I stamped my paper borders with the smaller stamp and used the the largest stamp on the TOP NOTE FRAME.  

Once I finished stamping the frame, I put 4 small slits into it and inserted my photo layer - again no glue but it will stay there and gives me the chance to change photos!

I finished the whole piece with selections from my stash such as 
 some fab ribbon I found on sale one day!  

I stamped the " LOVE YOU MUCH " - a stamp featured in our OCCASIONS Mini Cataloque, the "Well Scripted"  and a cute little birdcage from another stamp set, " HAPPY MOMENTS".  Shanna has used the bird cage from Stampin' Up!'s "CHIC BOUTIQUE" set. 

So I really like both of our versions - this layout is terrific, and could be used for so many things. 

ALTERNATIVE USES

I am also going to make more TOP NOTE FRAMES - because....I thought the frame can stand alone on its own - punch a couple of holes - and voila, you have a wall frame!  How cute would that be - even a whole series of them in a little girl's room!  

Hope you enjoyed visiting today! 

If you'd wish for anything here shown today - contact me! I'll be happy to help you. 


24 May 2010

Flower Punch Art - WT272 Album Cover


WT272 Album Cover

Yay - I finally finished my cover for my mini- album this morning!

Here it is!

Update - This is now my entry for SPLICOASTSTAMPERS May 27th's 'Ways to Use It' Challenge under "Paint " Technique! So I am required to post it as a 'WT272' project to help others find my entry! Hope they like it and you too!


I will post the basic steps in my process on how to make a cover such as this, so read below!

Hope everyone is having a wonderful week-end.  

Beverly


HOW I MADE MY COVER
HEART PUNCH FLOWER
1) Make a flower with 2 sizes of  HEART PUNCHES.  Bottom layer is attached with glue to a back support (paper circle)  -  use 4 large punched Hearts for bottom layer .....next, attach 6 small punched Hearts to create top layer (attach by applying glue to the tip area only).  Embellish center as you please - I used a small pink flower brad (shown in finished project).

Extra - I glossed over the large punched hearts with a thin layer of gloss medium - just to protect the paper more. I also 'crimped' the large hearts to add texture. 


Next, I created the cover by taking a 6x6 thick chipboard, and applying a layer of gesso and then 3 different colours of paint: purple, red and gold.  I applied them in large swatches covering the entire piece.   Then I began to cover up those bold colours with some light green, light blue, a bit of yellow, and then I mottled everything with white paint - using some packing plastic as my 'brush' - just dip into the paint and smudge or tap the paint "smooshing" some parts together and other areas left more "blobby".  LOL - hope you understand me!  Just go at it - there is no 'right way' - what-ever LOOKS GOOD TO YOU! 


I stamped a couple of images onto my finished paint job, dried them with my heat gun, then applied a layer of  Gloss Medium as a protection.  Now it can be handled and have a better measure of protection from fingerprints - and what-ever else I attach to it!!

Next I made a small cardstock layer with Whisper White cardstock which I decorated using the RUBBERBAND BRAYERING and EMBOSSING TECHNIQUE. (described in an earlier post) and I created and attached 4 photocorners.   


The embossing powder is Iridescent Ice - looks great white on white, but I chose to ink it up with colours! 


Now I want to title my cover - but for now I am beginning with an initial - F - for flowers of course!   I punched out an f letter in Only Orange cardstock, inked it with Razzleberry (IN COLOR) and coated it with CLEAR Embossing Powder. Now its more sturdy and ready to go!


I used the large heart to punch out some green cardstock, and cut those in half, rounded the edges to create a leaf or two......here's how to punch them out and cut: 


And now its all put together with brads, extra glitter, and just those little touches we add at the end - its all very personal - you can add as little or as much as you want!  


la la lah!!!!   Isn't it fun to go from bare to something wild!! Its like being back in grade school art class, lol. 


I will come back and add more ribbon to the binder rings holding the album together, but for now, this is all. 

 I am making the various pages, and then adding my rings at the end because I do not like the process of taking things on and off - too hard! 

Bye for now!

Talk to me to take a class on making your own album! 

Supplies: Stampin' Up! 
Embossing Powder, Ink, Versamark Pad & Marker, Cardstock, Glue, HEART PUNCHES


18 May 2010

Time is flying!! June 1 Sneak Peeks Begin!

Geez - I actually was caught off guard the other day when it dawned on me that JUNE is coming - which means, the end is nearing for the current IDEA CATALOGUE  - - which means you-know-what!

Yes, the NEW 2010-2011 IDEA BOOK & CATALOGUE from STAMPIN' UP! will be here in about 6 weeks!!

AND for anyone new out there to the Stampin' Up! universe .....this also means the LAST CHANCE LIST WILL BE HERE TOO - JUNE 1RST!!!!   AND ' SNEAK PEEKS ' !!!

So we will all be abuzz about the new things arriving - apparently our catalogue has grown by 16 pages!  16 pages - I'm wondering too - what will fill up 16 pages? ? ?

You know, it hasn't been that long since I started, and the first IDEA catalogue I had was for the year 2007 as it was ending. And to look in there - well, for one thing, there was no Big Shot!  Yeah, can't believe that now!
Also, there was no My Digital Studio ....and our assortment of punches was almost half of what it is today!

Plus we have seen so many new products in just the last two Mini-catalogues as well as the colour shake-up!  So for  16 NEW PAGES - I can't WAIT to find out what they will be!!!! LOL - honestly, the suspense!!!

SO stampers - we just have to sit tight!  It won't be long, not really, uh-uh! Nope!

I'll try to get news when I get it!  So stayed tuned!
Cheers!


17 May 2010

Punch Art Flowers

Aha....see, I asked you to come back and see my fun with punch art flowers!  HERE THEY ARE...so far!

It started not long ago with punch art roses, like this one....using one of Stampin' Up!'s latest manual punches, Ornament punch.....

Rose Flower


And this fueled my curiousity!  So last few days, I have been punching away like c r a z y !!! 

And the amount of inspiration in punched 'flowers' alone is  h u g e !!!  There are so many of lovely ideas! 

But so far, I am starting with easy ones....like these circle punches!

CIRCLE  PUNCHES

Flower #2


The colours here are a bit yellowed, that's just a flaw between my camera and the editing program!  It's fantastic looking in real life - beautiful green and a really fresh pink! 

Its only a matter of layering circles together - the bottom right, is a circle punched with a smaller circle and put together in a pleasing fashion - cool isn't it!  My daughter says its her fav so far! 

HEART PUNCHES 
Flower #3

Here's my first one with our Full Heart Punch....you can just do 4 to 5 larger hearts attached to a small circle center. 


But I decided to add a layer behind them, using half-hearts (pictured in blue), which I ran through my crimper. 


You do not have to stamp the heart but I have a co-ordinating heart stamp, so I did.


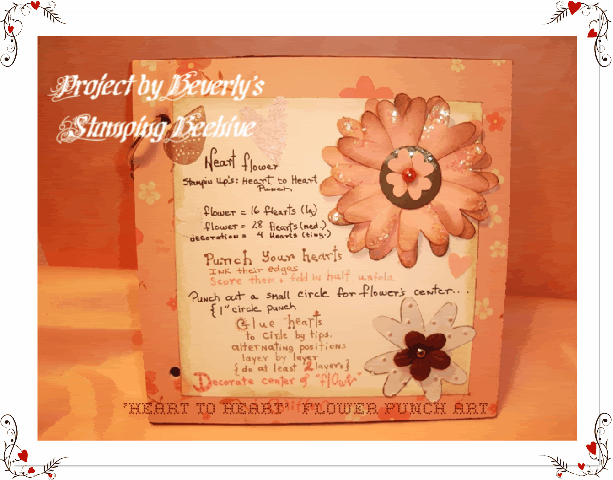
Now here is another HEART Punch Flower - however, this is using our Heart to Heart Punch!

This punch has 3 sizes of hearts in the one punch - so I used all three, let me show you...

Flower #4


This is the 'tall, thin' heart - and you attach several behind a small circle center, then attach more in a layer behind and so on. Sparkle and embellish with smaller hearts - be creative! 


The bottom right is the same heart, but its been created with paper that is first through the Big Shot with our embossing folder to create the raised dots. 


Flower #5 

Then over on the opposite side of my page, is the same punch - only this flower is using the 
"wider" heart of the 3!  
Lots of layering!!!!
It begins by tucking right side of the first heart behind the left half of the next heart,
 and so on - keep the hearts coming if you want a really full flower !  I added half-hearts as the final layer, to spread them out which gives it a more fringe look. 


Looks lovely with the texture - add ink highlighting to really show off those polka dots! 


The center of the top flower is made by adding a couple of layers of the small heart, and curling them upwards.  
Half Flower = And the bottom left is showing a flower not quite in bloom.
I used the 5 Petal Flower punch, and cut it in half and the stem is a circle punch to create a curved area on your paper, then move the punch upwards a little above that curve - punch again - and you will have a stem! 


Anyways - that's a tour of the flowers I've created so far.  I am also working on a project that involves Punch Art Fairies - boy, so many great projects for the sunnier side of our year!!!


CLASS PROJECTS/ EVENT PROJECTS
 Its hard to pick which ones I want to design a class or a larger event around - this time of the year conjures up soooooo many great projects that I wish I could offer a class a day!   

I will be going to do a class event around this!  How big of a project is all I need to figure out. Half a day would probably do nicely for making a small 6x6 Album of PUNCH ART  projects.

Please enquire or stay tuned!  

Bye! 
Beverly :)

Gift Idea with Stampin' Up!


So what's this?

Welllllll........it starts like this...


A little bag of chocolate peanuts...all dressed up and tagged....and then you add this....


And now you have THIS! 


And now you have a lil somethin' to brighten up someone special's day!
And it looks good, no matter where you set it for them to find.....see...


....they'll just be comin' along, and they'll see it...and when they're up close - it'll be "oooh what's this?" 
And they'll be happy.
The end.


Stampin' Up! Supplies:

XL Flower Punch
Large Oval Punch
Greeting stamps
'Voila' Stamp set
Soft Suede Cardstock
Bermuda Bay Cardstock
and project idea, pg 57 current Idea Book and Catalogue


15 May 2010

Make YOUR OWN Craft Ink!

Here's softness in a card!

Pretty in pink, and natural colours....and lovely satin ribbon!  This is our natural cardstock and I love how it has tiny flecks in it - and the colour itself is a combination of ivory and kraft ? - its hard to say, but it has a 'home-grown' feeling to it.

So naturally it looks great with nature themed stamping - and that's what we did.

But our real purpose was to use regular DYE  INK mixed with VERSAMARK (watercolouring) INK and in doing so, create our own CRAFT INK!!!

Get set up with your supplies, ink pads, versamark pad, a CLEANING PAD, glitter tray, clear emboss powder, heat gun........here you go:

     1) STAMP WITH A CLEAN STAMP - into your VERSAMARK and immediately into the DYE INK of your choice - then stamp!

     2) CLEAN STAMP and REPEAT IMAGE - and -  REPEAT with SECOND, AND THIRD DYE INK COLOURS + OTHER STAMPS - always with a clean stamp!   (we are multi-tasking! - but we are good at this aren't we!)

     3) EMBOSS by adding CLEAR EMBOSS POWDER - quickly (we are nimble today!) - and tap off excess, HEAT with heat gun.

     5) TIE RIBBON - under the inside and both ends to the front, and make a knot. Create nice ends to your ribbon with small sharp scissors.


14 May 2010

Reverse Spotlighting Technique


REVERSE SPOTLIGHTING
A DIFFERENT WAY TO MAKE THINGS 'POP'!


You NEED:  
 circle punch (ex 1-1/2 ") 
Ink and stamp of choice (larger scale stamp design)....
White [3-3/4 x 5] in. cardstock
 1 Colour  cardstock scrap....
1 Colour cardstock card base [8-1/2 x 5-1/2 in.]


Basic Instructions ....

CREATE THE FRONT CARD FACE by stamping a sheet of white cardstock  [ 3-3/4 x 5 in] with black ink using a nice fluffy floral design.  Like the flower they have shown here. 

Then - with the circle punch, PUNCH a few holes into some of the flowers, leaving some of the flower design intact. 

Stamp the same design onto the scrap colour cardstock, and cut flowers out. These are lined up and MOUNTED BEHIND the flowers in the punched out circular areas - which restores the full design of the flower!!! There will still be a gap from the punched out circle, but wait......

Trim the card front layer, to clean, straight edges. 

Now mount the finished piece onto the third colour of the card base { folded 8-1/2 x 5-1/2 in.], embellish if you wish with a greeting or other accent!  

Pretty nifty!  

CLICK on picture, and then on MAGNIFYING ICON to Enlarge Photo. 


Idea submitted on Stampin' Up! Cruise 2002 by M. Hallen! ")


Punch Flowers

BOY - AM I having fun making 'punch art flowers' this past couple of days!!!  It's now a new passion of mine!
I can't wait to finish a few pages more of my new, dedicated to FLOWERS MINI-ALBUM!!!

And I can post a few pics. So c'mon back!


RETIRING COLOURS/PRODUCTS RUNNING OUT....ON BACK-ORDER WHERE POSSIBLE! 
NEXT - ladies - if you are at all interested in owning some of our retiring colours - in what-ever form, such as cardstock, or ink, crayons, ribbon, ....well, you get it.....HURRY ON and ORDER!!!   It turns out that the anticipated level of ordering was under-estimated, or crafters just panicked and decided to grab while they can, and Stampin' Up! is overwhelmed with orders - on certain colours!  So, the solution is a tiny bit complicated....they do want to honour orders until the end of the current catty, but they do not want to re-invest in a new production of product.  SO - substitutions for the more expensive textured cardstock will take place where regular cardstock has run out. (good for the consumer!).....and BACK-ORDERS - are, well, on back-order.  SO it remains to be seen, how many of us will have our fav retiring products by the end of it all.

Just sayin'...so you know!

GONE ALREADY - NO MORE! The cute lil felt flowers, the paper of the Sweet Pea line and the On Board Heart (chipboard book)- is all gone.

And I am trying to balance this with all the new stuff I want from the NEW OCCASIONS MINI-CATALOGUE - sheesh! Such problems!!!! LOL!

10 May 2010

BLOG CANDY COMING MAY 31rst!!!!

Hellooo to all the lovely stampers who've come to visit my lil blog!

I have been blogging for awhile now and its about time I had something up for grabs!

I love putting together gifts - don't you?  I sometimes think that if I were not stamping and doing Stampin' Up! as my part-time work, that I should of been involved with gift baskets!

I want to help someone have fun making the latest trend.....MINI-ALBUMS!  Love them! You will too!
Soooo here are some supplies to get you started.....
bLOg CaNDy =  (1) On Board Mini Album Book from Spring or Summer Mini Catalogue (may be a bird or suitcase) + (1) Ink Pad + (1) Sanding Block + (1) STAMP  (value up to $12) and an assortment of die-cuts from my personal collection.

OK - here's how you can enter effective MAY 1 :
                    - POST A COMMENT - each and every comment 'per post' =  1 entry for the draw
                       [no limit on the posts you comment on - but restricted to one comment each post]
                       **  note as a bonus - April's comments received will be automatically entered!

                    - be a follower = 5 automatic entries {previous followers receive automatic 5}
                
                    - mention me on your blog = 5 entries but I require you to email me so I know!
                      [[ if you also joined as a follower that will be 10 times total]]

So, you can have many entries if you follow the above instructions!  More entries = better chance to win!


Please note Restrictions and Contest END DATE
    1)   All entry's will stop on MAY 31rst 00:01 AM Eastern time. 
     2)  Contest restricted to North America -
      3) I reserve the right to substitute any item if it becomes unavailble.
     4)  please do not apply if you are a demonstrator for any rubberstamping company. We all understand that regular stampers require the need to access free supplies than we as sellers do. Thank you for understanding.


Have fun!
  AND THANKS FOR VISITING MY BLOG!!!!

Mother's Day Flower Topiary

Here is what I showed a glimpse of the other day - my flower topiary!


 I have been wanting to do one for quite awhile and finally, a couple weeks ago, I started.  I started by merely punching out flower after flower. First, using a Scallop Circle Punch, I began with the largest flower in the pale Pretty in Pink shade - and then a small bowl of Chocolate Chip brown flowers with our Stampin' Up! Trio Flower Punch  - while watching tv.

On the commercials, I glittered all around the edge of each pink flower with glitter glue and set them in rows on a plastic tray to dry. Then I tossed everything in to a basket and set it aside for another day.

Then about a week later, I decided it was 'pin-up' time!  So I rummaged around my stashes and found a half circle florist foam piece - and then a search for a vessel to set it into to. My small ceramic urn was just the thing! But a small bowl would have worked too - I'm sure we all have something! I grabbed my basket of punched flowers - and headed to the table.

I used tiny pins - don't even know where they originally came from, I just have a jar of them. But they are slender like sewing pins - so I guess you could use those too.

I insert the pin into the little brown flowers - to help anchor the pin better before inserting it into the large pink flower.  [* You could start with a bead  if you wanted to].

Next, you insert the entire flower assemble into the foam placing the flowers right up beside each other as close as possible!!! You may have to press down on the "collection" of flowers as you cover the foam in order to add another flower.

I did a few of these into the foam - when I dawned on me that the paper was too stiff.  The flowers at this point were "bucking up" too much and it was becoming a struggle.

My solution - I took the pink flowers off and squished each one - in-between my hands, pressing it into a ball and turning it around, pressing it some more - or alternately, folding it into soft 'pleats' and pressing that tight, unfolding and re-folding till the entire flower became - supple.  There will be little crinkles in the flower, but now that adds a certain charm!

This took me a few flowers to discover which method I liked the best - then I was able to finish the rest of them fairly fast.

Now, when I went to pin them into the foam in clusters - it worked, they squished up beside one another easily!!! :)


After finishing all the flowers - I had a few bald spots near the base.  I decided to try a different flower shape, and used a deeper pink shade - Melon Mambo cardstock. This worked really well.

I punched out some leaf stems - and stuck them along the ridge of the urn with glue dots.
Then set the topiary into the urn.

Only after did I decide to add the little embellishments to the top of the topiary - just to signify Mother's Day! That little bird is from our latest Stampin' Up! punches - one punch gives you the bird, the wing and the leaf stem shown beside the bird [ XL 2-Step Bird] .  My 'handle' so to speak, is another one of our new border punches, Scallop Trim Border  which I earned free during Sale-A-Bration. It will appear in the new Idea Catalogue coming in June.

Alternate Ideas
A person could do this even on a grander scale by doing a "double topiary ball" style using a smaller ball above the larger one.  A thin bamboo stick would be useful to attach the two together.

Or turn the whole thing into a hanging ball - by covering an entire foam ball and attaching a ribbon to hang it with  - they could hang on chairs for weddings!  Or just outside on the porch - spray the entire piece with a clear protective coat to make it waterproof!

You could cover a different foam shape with these - a wreath, or even a swan - wouldn't that be something!  Oooh, think I know what I want to try next!

Cheers!
Beverly

8 May 2010

Recent Cards I've Made


These simple but playful monogram cards can be easily made with our large alphabet dies, Sans Serif.  Then use your imagination with our crimper! 


I am trying my hand with a shabby look, slightly vintage too if you consider the watchclock. I have used a scrap piece of acetate which I printed a excerpt from Robert Frost's  Blue-Butterfly Day....and I painted the background stamp with some markers and chalk, while also using a wheel stamp, and gold ink to hightlight areas. And a little pink 'frosting' on the sides. But mainly, I wanted to use the 'window' technique where I have rolled back the top paper layer to create a space behind for my focal point, its really nice technique!  

*****

STAMPIN' UP SUPPLIES
Equipment - The Big Shot,  crimper tool,
Dies - Bigz 'Beautiful Butterflies'; Bigz Sans Serif Alphabet for monogram letter, L; Bigz Bird with Leaves and Flower ( floral stem), 
Stamps - Fresh Cuts, 
Colouring - Pink Passion Stampin' Write Marker, Stampin' Pastels (chalk); Encore Gold Ink Pad,
Cardstock - 
8.5x11 - Window Card = Chocolate Chip, Whisper White, Melon Mambo and Pretty in Pink
              Monogram Card =  Bermuda Bay, and Pretty in Pink
6 x 6 -    Monogram Card = Good Neighbor (in Bermuda Bay)  Sale-A-Bration cardstock,
12 x 12 - Window Card =  CLEAR Window Sheets {medium}Item # 114323, 
Other - glue, glue dots 

* our dies are compatible with manual die-cutting machines such as The Big Shot, The Cuttlebug, etc. Please inquire if you have any questions. 

- LEARN HAND-MADE CARD IDEAS -

The ways stamping becomes part of the home! Create photo memories of your hobby.

You know, I love taking pictures of just plain things around our home - they're snapshots of how we are living today, for us to view tomorrow!  I've been doing it now for a really long time. And I am fond of looking at them from time to time - just little postcard reminders of a time now past.


Like long ago, I took a picture of my daughter's tiny shoes placed next to mine by the door.  Or how a vase of flowers was by the kitchen sink - with a flower in it that she brought home from school. Those are esp. fun to see now.

Sometimes, its just a mess of my craft supplies - a table setting, a little vignette of personal belongings grouped together in the china cabinet....once I took a picture of myself peering through a clear vase filled with blue tinted water. The vase's shape curved my face - it was one of the more interesting portraits of myself because it was just whimsically goofy - something I am sure my daughter will laugh at in years to come.

I do try to convince everyone to let their guard down and let us take pictures of each other in everyday moments - as you come out after a shower in a housecoat and your hair wrapped in a towel -- its more 'you' that speaks to your close family than any fancy portrait taken in a studio.

See, this is me.....photo op for a craft event I was doing...


But so is this...I look like this making up projects in the wee hours...


But often, I decorate things in my home - or leave messages - or even like in my earlier post, make entire projects with my rubber stamps, my tools, inks and ribbons, etc. And they become an integral part of my life ---for a time!   And by taking a snapshot of them, seals that particular time making a little " time capsule" called my photo collection!

Here is what I mean....our two keychain/door passes that I decorated, side by side....


And also, our dog's biscuit jar that I put stickers on....


Or for awhile, when we first got the dog, I made these signs and posted them everywhere, lol....even on my daughter's bathroom mirror, lol!


Now, I've made her a small clipboard center - where she can keep those darn ID tags and cards she needs - and can't find at the last minute!   It's got a little post it note pad - so technically, its a message center!  She also said, I needed to go outside my 'usual' colour choices - well, I hope she got her wish! ha ha ....


The family unit! 


My own 'reminder' systems....


Another stamper friend and I taking pictures of each other!


Look - I'm stamping last minute - on the bus!  I am so proud of myself, I took my own picture to prove it, lol!


Look - one day, this will remind me of all the ribbon I started to collect....a scrapbook moment! 


And my little 'Bee' mascot watching on during a class...it's Beverly's Stamping Beehive after all! 


Now that Stampin' Up! has clear blocks and repositionable rubber stamps - pictures like this will be less often!  

I'm sure my daughter will be pleased to be reminded of when we held a craft event at Ronald MacDonald House at christmas time....


So, however you wish to do it....just take pictures of all sorts of things in those quiet times, the crazy-paced times, and of things that seem quite ordinary - and anything to do about your hobby -  because after all, it is a collection of what we are!  And just see if you don't find a way to put it together in a scrapbook!  I double-dare ya!

Have a great week-end!  Be Back to finish off my Mother's Day project - and I'm off tomorrow to another craft event, yeahhhhh! 

yours truly, B! 


Template by: